Preset Designer
Preset Designer is a tool to help you set up your PvP presets. Its function is not to fully automate the process although it can do some of it for you. There are too many variables in play to be fully automatic such as march sizes for specific generals and whether you are using a March Size Buff.
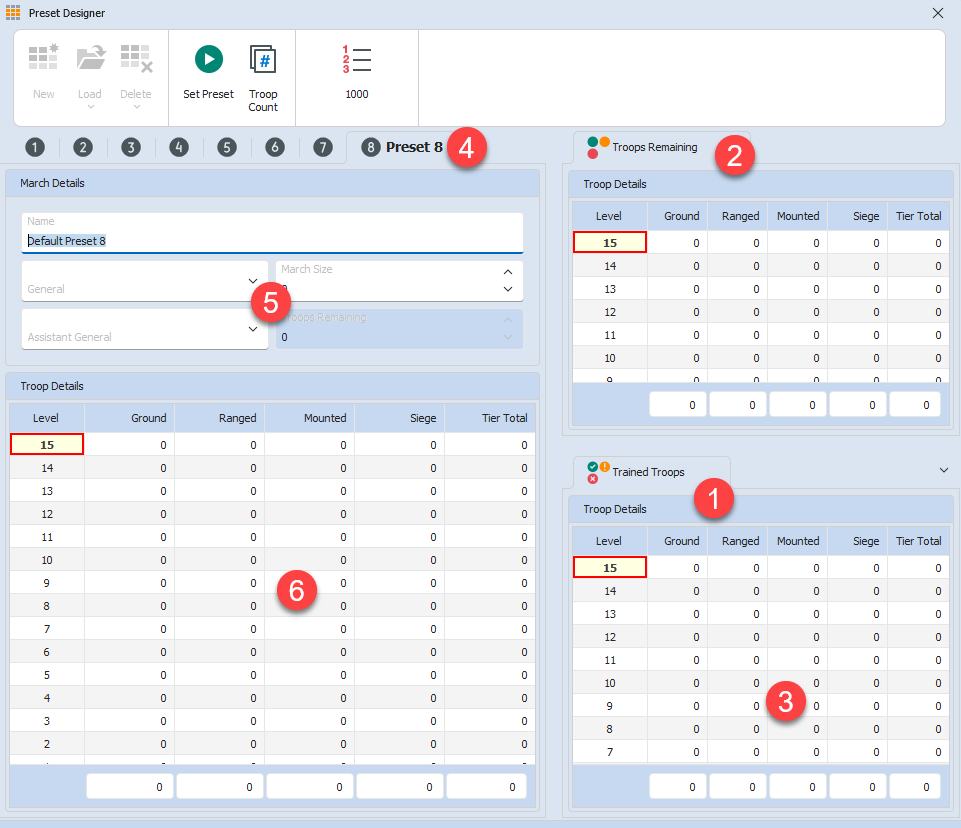
- This is where you enter the number of troops you have in total
- The troops you have remaining are displayed in this area.
- The input/display grid
- Preset Chooser
- Preset Details
- Troop Input area
Setting up your available troops.
You can either enter your troops manually into the Trained Troops area or you can let Ragebot count them for you.
When the Troop Count routine has completed, check your troop count in the game and in Ragebot is the same. If it is not, determine what was read incorrectly and correct it. You may even find that running the Troop Count again will give you better results. Ragebot reads the screen using OCR and unfortunately, is not always 100% accurate.
Setting up your Presets
Click each Preset Tab (4) in turn. Enter a name to remind you of its primary purpose. e.g "PvP Ground (200% March Buff)" or "Siege General Levelling" etc
Enter the General name to remind you who the march is optimised for.
Enter the March Size that you have for that General with the buffs you will have enabled.
Enter the number of troops of each tier into the Troop Input Area (6). If you switch to the "Remaining Troops" tab, each time you input troops into a preset, you will notice the corresponding Troop Count in "Available Troops" decrease. If you use more troops in your presets than you actually have, you will see the boxes turn red.
Similarly, should you use more troops than your configured march size, you will see the Remaining Troops box in the Troop Input Area turn red.
Remaining Troops is calculated by taking your Trained Troops and then decreasing it by the number of troops in each preset. By noting the appearance of the red boxes, you can ensure you do not share troops between presets and that each preset can be sent to battle independently of the others.
When you have set up all of your presets, you can load them into the game.
Navigate to the Preset Editor in game (at the rally spot), choose the preset and set the correct general. Buff the march if required. Ensure that all your troops are home. The game is rather silly in that it only allows you to use troops in a preset that are not doing anything else at the time.
Once this is done, your march size in game should match the march size you entered into Ragebot.
Select the Preset tab in Ragebot that matches the preset number selected in game and press the "Start" button the toolbar.
Ragebot will scroll down your troops and input your selected troops into each troop tier.
Once it has finished, check the troop counts match and press the "Save" button in game to lock the troops into your preset. Repeat this for each preset.
Preset Spares
Whilst only 8 presets can be loaded (one in each preset tab) at any one time, you can create any number you like. To create a new preset, select the preset tab you want to use and press the "New Preset" button on the toolbar. Confirm that you want to create a new preset and one will be created and loaded into the selected slot. The existing preset will remain in a "Holding Area" and you can either delete it or load it into a different slot by using the buttons on the toolbar.
This allows you to set up as many presets as you like and (relatively) quickly load them into the game.