Start Rallies Tutorial
Starting rallies is not as complex as you might think. It only needs 3 things.
- Marches configured to kill bosses.
- The Start Rallies routine to be enabled.
- Valid bosses in the cache.
The marches require the most setting up. These are done using the March Designer.
Rallies use either Battle Marches or Preset Marches. You will choose the one that fits your workflow the best.
Battle March.
Battle marches are the slower of the two as all of the troops and Generals needed are selected manually. If speed if required, you should go for Preset Marches instead.
Create a new Battle March in the March Designer and give it a name.
Add the troops that the march will use for the rally.
Set the March Priority. If more than one march is capable of killing the same boss, the march with the highest priority will be used first.
Add the Generals to use. If you want to reuse the same march multiple times, set the Marches Available setting and add at least this many generals. If you have presets set up that already have the generals you want, yo ucan set the General Preset setting to the required preset and Ragebot will click that before looking for your Generals. This can save time when setting the rally.
Ensure you have enough troops to fill your march that many times. For example, if your march uses 2M troops and you want ot use the march 3 times, you will need to make sure you have at least 6M troops.
As you get more experienced, you can switch to Advanced March Mode which offers greater flexibility with your marches and troops.
Add the bosses that this march can kill with no wounded. This would be quite specific to you as it depends on the generals, troops and buffs you have.
Preset March
A Preset March is much faster than a Battle March.
It does not need you to add troops or Generals unless you are using Advanced March Mode. You need only tell it which in-game preset to click.
The other options are set the same way as a Battle March.
As you might imagine, not needing to select troops or generals when setting the rally makes the process much faster.
Start Rallies Routine.
Enable the routine and set the options you want to use. Ensure you are using the cache that contains your bosses.
The Boss Cache.
There are various ways to fill the Boss Cache with bosses. The fastest is the Telegram Bot Integration.
If you do not want to subscribe to this service, you can use any of the following methods.
- The Boss Finder routine.
- Enable Find Bosses in the Gathering routine.
- Use the Join Rallies option of Join From Chat and enable the Boss Caching options. When joining rallies, any bosses posted will be added to the cache. Note that this setting uses the list of Bosses from the Boss Finder routine to determine whether to cache the boss or not.
- Whisper Monitor will cache bosses are are set to you via whisper.
Interpreting the Cache
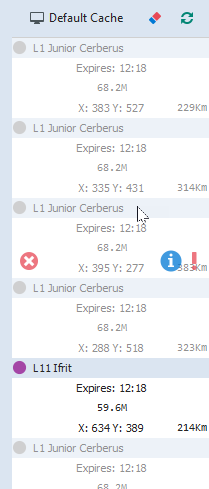
The cache will appear next to Activity log once the Start Rallies routine is enabled.
Some bosses may be greyed out. These are currently not usable and no rallies can be set on them.
The Ifrit is not greyed out so is available to be rallied.
If you hover over any of the bosses in the cache, you will see a blue "Info" icon. If you click that icon, it will tell you why that boss is currently not usable.
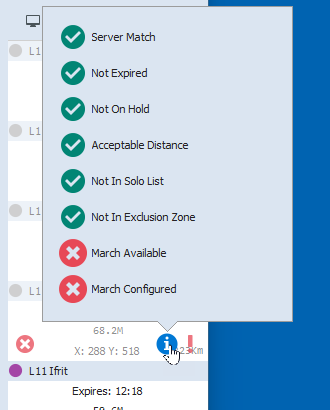
For example, in this case,
March Configured
No march has been created that is capable of killing this boss.
March Available
There is no march available that can kill the boss.
Once you have created your marches and cached your bosses, you are ready to start setting rallies. If you are starting for the first time, it would be best to enable ONLY the Start Ralllies routine.
Start the instance and allow the Start Rallies routine to do its work.
The routine will take bosses from the cache based on the marches it has available.
You can keep track of the marches that are in use by using the March Simulator. This can also help you troubleshoot why bosses may be grey even though they have a march to kill them.